London:
Nationwide:
25,000+
Floors Restored
27 Years Experience
Wood Flooring Association Certified
Laminate Flooring Underlay Guide: Choosing the Best
Posted on December 6, 2023
Laminate Flooring
Selecting the Ideal Laminate Flooring Underlay: Your Comprehensive Guide
Laying the foundation for a perfect laminate flooring installation involves more than just the surface layer you see and walk on. The often-overlooked hero behind your beautiful laminate floors is the underlay. In this comprehensive guide, we’ll explore the world of laminate flooring underlay to help you make the best choice for your home.
You might be wondering, “Why is the underlay so important?” Well, think of it as the unsung hero of your flooring project. It not only provides crucial support for your laminate planks but also contributes to your floor’s longevity, comfort, and performance.
In this guide, we’ll cover everything you need to know about laminate flooring underlay. From the different types available to their respective benefits, thickness considerations, moisture protection, soundproofing capabilities, and eco-friendly options, we’ll leave no stone unturned. You’ll gain insights into proper installation techniques, budget considerations, and even how to maintain your underlay for years of optimal performance.
So, whether you’re a DIY enthusiast embarking on a home improvement project or a homeowner looking to upgrade your flooring, this guide will be your go-to resource for choosing the best laminate flooring underlay. Let’s dive in and lay the groundwork for your flooring success!
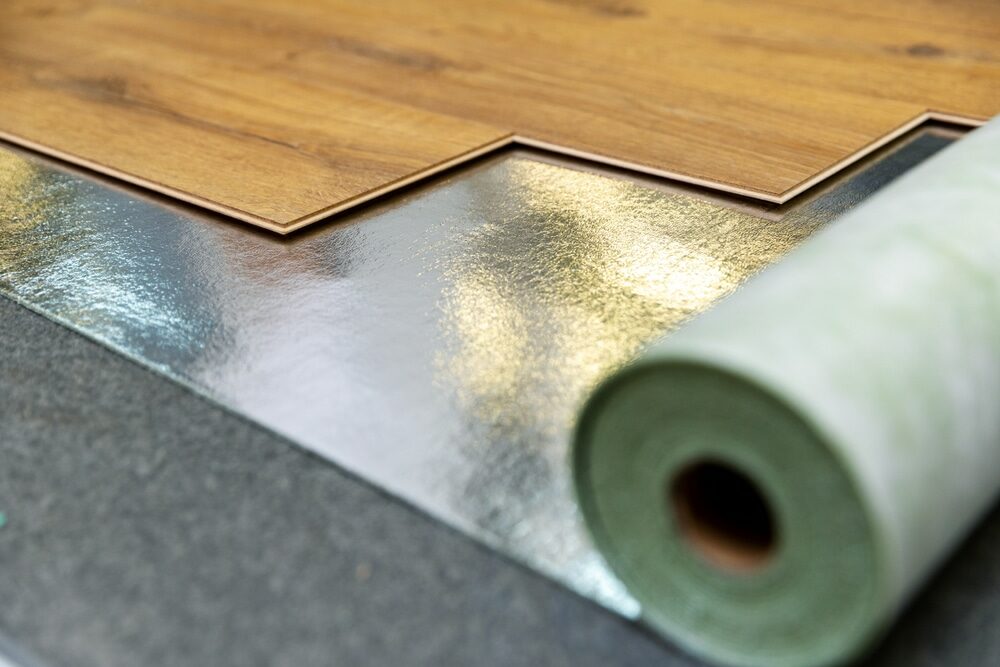
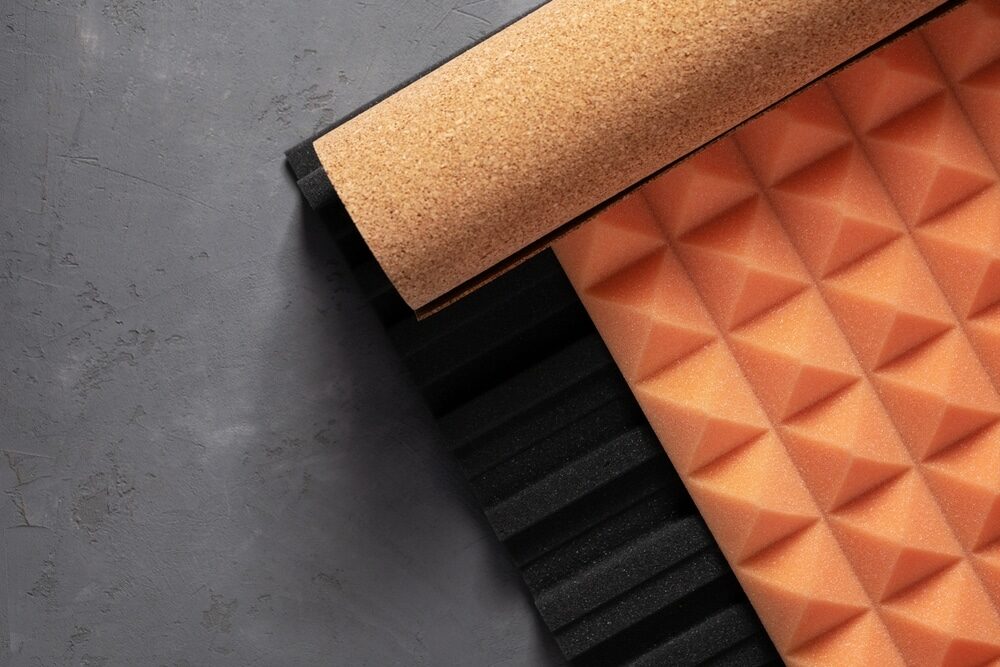
Types of Underlay
When it comes to laminate flooring underlay, there isn’t a one-size-fits-all solution. The right type of underlay for your project depends on various factors, including your budget, subfloor type, and the specific qualities you desire. Here’s a breakdown of the most common types of underlay:
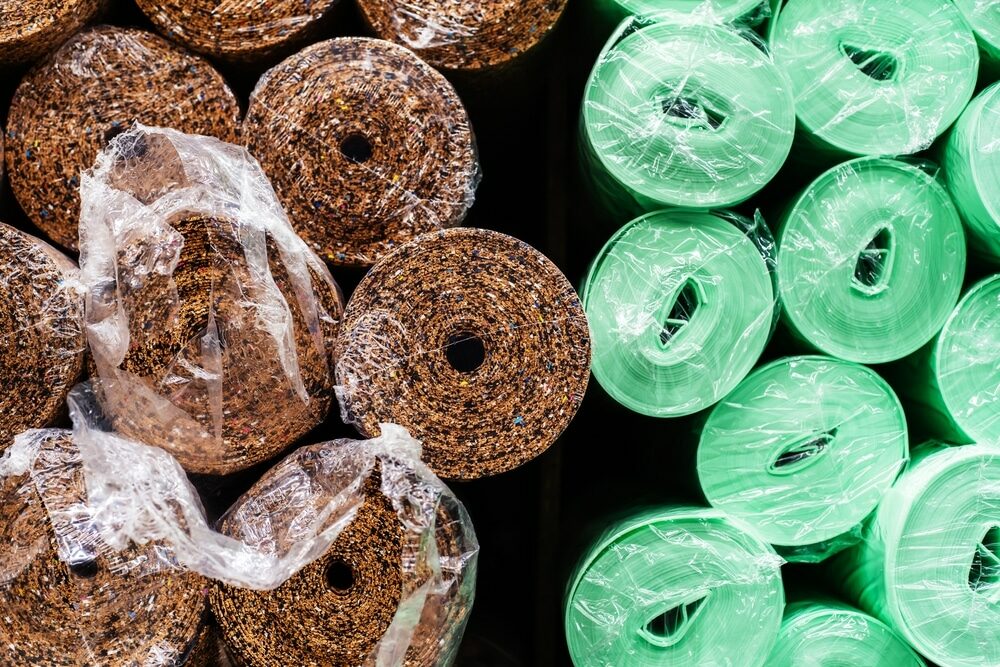
1. Foam Underlay:
- Material: Foam underlay is typically made from polyethylene or polypropylene.
- Benefits: It offers good cushioning, moisture resistance, and sound absorption. Foam underlay is cost-effective and easy to install.
- Best for: Areas with moderate foot traffic and where noise reduction is a priority.
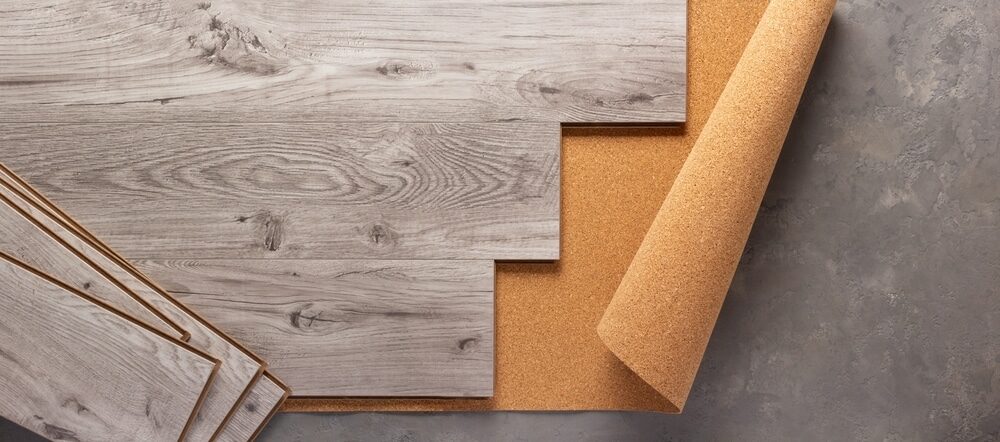
2. Cork Underlay:
- Material: Cork underlay is made from natural cork, which is a sustainable and eco-friendly option.
- Benefits: Cork underlay provides excellent insulation, moisture resistance, and sound absorption. It’s also naturally mold- and mildew-resistant.
- Best for: bedrooms, living rooms, and spaces where comfort and eco-friendliness are essential.
3. Rubber Underlay:
- Material: The rubber underlay is constructed from recycled rubber or synthetic rubber compounds.
- Benefits: It offers outstanding impact resistance, soundproofing, and durability. Rubber underlay is an excellent choice for reducing noise transfer between floors.
- Best for: high-traffic areas, such as kitchens and hallways, and spaces where noise reduction is crucial.
4. Felt Underlay:
- Material: The felt underlay is made from compressed recycled fibers.
- Benefits: It provides moderate cushioning, warmth, and noise reduction. Felt underlay is often used in conjunction with other underlay types for added benefits.
- Best for: bedrooms and areas where thermal insulation is a prior
5. Combination Underlay:
- Material: A combination underlay combines multiple materials to offer a range of benefits.
- Benefits: This type of underlay can provide a balance of cushioning, insulation, moisture resistance, and noise reduction. It’s versatile and adaptable to various flooring needs.
- Best for: Versatile use across different rooms and flooring types, allowing you to tailor the underlay to your specific requirements.
Choosing the right type of underlay is crucial to achieving the desired performance and comfort for your laminate flooring. Consider factors such as your subfloor condition, the level of foot traffic in the area, and your budget when making your selection. Each type of underlay has its own unique advantages, so choose the one that aligns best with your needs and preferences.
Thickness Matters
When selecting a laminate flooring underlay, one crucial factor to consider is its thickness. The thickness of the underlay can significantly impact the performance, comfort, and durability of your laminate flooring. Here’s why thickness matters and what you should keep in mind:
-
Impact on Comfort and Insulation:
- A thinner underlay provides enhanced comfort underfoot. It cushions the laminate flooring, making it more comfortable to walk on.
- It also improves insulation, helping to keep your room warmer and reducing energy costs. A thinner underlay adds an extra layer of thermal resistance.
-
Balancing Thickness with Floor Height:
- While a thicker underlay offers more cushioning and insulation, it can raise the floor level. This might be a concern if you have doors or cabinets with tight clearances.
- Consider the existing floor height and the impact of adding underlay to ensure it won’t create problems with door clearance or transitions between rooms.
-
Subfloor Imperfections:
- A thicker underlay can help compensate for minor subfloor imperfections, creating a smoother surface for your laminate flooring.
- If your subfloor has significant irregularities, you may need to address them separately before installing the underlay.
-
Acoustic Benefits:
- Thicker underlay often provides better sound insulation, reducing the transmission of noise between floors or rooms.
- If noise reduction is a priority, choosing a thicker underlay can contribute to a quieter living space.
-
Flooring manufacturer recommendations:
- Be sure to check the recommendations of the laminate flooring manufacturer. Some laminate flooring products specify a particular underlay thickness for optimal performance and warranty coverage.
-
Cost Considerations:
- Thicker underlay generally costs more than thinner options. Consider your budget when deciding on the underlay thickness, and find the right balance between performance and affordability.
The thickness of your laminate flooring underlay can have a significant impact on your overall flooring experience. It affects comfort, insulation, and noise reduction. However, it’s essential to strike a balance between the benefits of thickness and potential challenges like floor height issues. Be sure to consider your specific needs, subfloor condition, and budget to make an informed decision about the underlay thickness that’s best for your laminate flooring project.
Moisture Protection
Moisture can be the enemy of laminate flooring, leading to warping, swelling, and damage over time. The right underlay can provide a critical layer of protection against moisture infiltration. Here’s what you need to know about moisture protection with laminate flooring underlay:
-
The Role of Underlay in Moisture Resistance:
- The underlay acts as a barrier between your laminate flooring and the subfloor. This barrier helps prevent moisture from the subfloor from reaching the laminate planks.
- Even in dry environments, small amounts of moisture can still seep through, making a moisture-resistant underlay important for long-term durability.
-
Vapor Barrier Underlay:
- The vapor barrier underlay is specifically designed to block moisture vapor from rising through the subfloor. It typically has a plastic or foil layer that serves as an effective moisture barrier.
- This type of underlay is essential in areas prone to humidity or moisture, such as basements or bathrooms.
-
Preventing Mold and Mildew:
- Moisture can create ideal conditions for mold and mildew growth, which can not only damage your flooring but also pose health risks.
- Using a moisture-resistant underlay can help prevent mold and mildew by keeping moisture at bay.
-
Subfloor Assessment:
- Before choosing an underlay for moisture protection, assess your subfloor’s moisture level. You can use a moisture meter to determine if moisture is a concern.
- If your subfloor has a history of moisture issues or if you’re installing laminate in a high-moisture area, prioritize underlays with superior moisture resistance.
-
Installation Tips for Moisture Protection:
- Properly seal the seams and edges of the underlay to create a continuous moisture barrier.
- Use adhesive or tape designed for underlay seams to ensure a secure seal.
-
Compatibility with Floating Floors:
- If you’re installing a floating laminate floor, make sure the underlay is compatible with this installation method. Many underlays are designed for use with floating floors.
-
Consider Subfloor Preparation:
- If your subfloor is prone to moisture issues, consider addressing these problems before installing the underlay and laminate flooring. This may involve sealing or waterproofing the subfloor.
-
Warranty Considerations:
- Check the warranty requirements of your laminate flooring manufacturer. Some warranties may specify the use of a moisture-resistant underlay to ensure coverage.
Moisture protection is a critical aspect of underlay selection for laminate flooring. Investing in a moisture-resistant underlay can safeguard your flooring investment, prevent damage, and promote a healthier indoor environment. Be sure to assess your specific moisture risks and choose an underlay that offers the level of protection needed for your project’s longevity and performance.
Soundproofing and noise reduction
One of the often-overlooked benefits of laminate flooring underlay is its role in soundproofing and noise reduction. Whether you want to create a quiet sanctuary or simply reduce the noise transfer between floors and rooms, the right underlay can make a significant difference. Here’s what you need to know about soundproofing and noise reduction with laminate flooring underlay:
-
How the underlay reduces noise:
- Underlay serves as a buffer between the laminate flooring and the subfloor, absorbing and dampening impact and airborne noise.
- Impact noise, such as footsteps or objects being dropped, is reduced as the underlay absorbs the shock.
- Airborne noise, like voices or music, is also minimized because the underlay reduces sound transmission through the floor.
-
Understanding Sound Transmission Class (STC) and Impact Insulation Class (IIC):
- These are standardized measurements used to assess the soundproofing qualities of underlay and flooring systems.
- STC (Sound Transmission Class): Measures the ability of a floor assembly to reduce airborne sound transmission. A higher STC rating indicates better soundproofing.
- IIC (Impact Insulation Class): Measures the ability of a floor assembly to reduce impact noise, such as footsteps. A higher IIC rating signifies superior impact noise reduction.
-
Selecting Underlay for a Quiet Environment:
- If you’re particularly concerned about noise reduction, opt for underlays specifically designed for soundproofing.
- Some underlays feature acoustic properties and are engineered to provide excellent STC and IIC ratings.
-
Use Cases for Noise Reduction:
- Bedrooms: a quieter environment for restful sleep.
- Apartments and Condos: Minimizing noise transfer to neighboring units
- Home Offices: Reducing distractions for focused work
- Home Theaters: Enhancing audio quality by minimizing sound reverberation
-
Installation tips for maximum noise reduction:
- Ensure proper installation of the underlay, including sealing seams and edges.
- Use acoustic underlayment padding under laminate flooring to enhance noise reduction.
-
Understand Flooring Impact on Noise:
- Keep in mind that laminate flooring itself can affect noise levels. Thicker laminate with an attached underlayment can provide additional noise reduction benefits.
-
Compliance with Building Codes:
- In some multi-unit buildings, there may be building codes or regulations regarding noise reduction. Make sure your underlay selection complies with local codes, if applicable.
-
Maintenance of Noise Reduction Performance:
- Regularly inspect and maintain your underlay to ensure its continued effectiveness in reducing noise.
Choosing the right laminate flooring underlay can significantly improve the soundproofing and noise-reduction capabilities of your floor. Consider your specific needs, the type of noise you want to minimize, and any applicable building codes when selecting an underlay for a quieter and more comfortable living space.

Subfloor Preparation
Proper subfloor preparation is crucial when installing laminate flooring underlay. A well-prepared subfloor ensures a smooth and stable base for your laminate flooring, preventing issues like squeaks, unevenness, and premature wear. Here are the steps for subfloor preparation:
-
Inspect the subfloor.
- Begin by thoroughly inspecting the subfloor for any imperfections, damage, or moisture issues. Address these problems before proceeding with the underlay installation.
-
Clean the subfloor:
- Remove any debris, dust, or dirt from the subfloor’s surface. A clean surface ensures better adhesion to the underlay.
-
Level the subfloor:
- Use a straightedge or leveling tool to identify any high or low spots on the subfloor. High spots can be sanded down, while low spots may need to be filled with a self-leveling compound. A level subfloor is essential for preventing laminate flooring from flexing or squeaking.
-
Repair subfloor damage:
- Fix any damaged or weakened areas of the subfloor, such as loose or squeaky floorboards. Secure loose boards and replace damaged ones to create a solid foundation.
-
Address moisture concerns:
- If your subfloor is concrete and prone to moisture, perform a moisture test to check for excessive moisture levels. High moisture can damage laminate flooring and the underlay. If needed, apply a moisture barrier or sealant to the concrete subfloor.
-
Consider Underlayment Padding:
- Some laminate underlays come with attached padding, while others require a separate padding layer. Follow the manufacturer’s recommendations for your chosen underlay type.
-
Allow for expansion gaps.
- Leave an expansion gap around the perimeter of the room to accommodate any natural expansion and contraction of the laminate flooring. The specific gap size will depend on the manufacturer’s recommendations.
-
Acoustic Underlayment Padding:
- If sound reduction is a priority, consider installing acoustic underlayment padding in addition to the standard underlay. This can further reduce impact and airborne noise transmission.
-
Test the subfloor:
- Before proceeding with the underlay installation, walk around the subfloor to ensure it feels solid and no squeaks are present. Address any remaining issues before continuing.
-
Moisture Barrier (if needed):
- If you’re installing laminate flooring in a high-moisture area or over a concrete subfloor, consider adding a separate moisture barrier on top of the subfloor before laying the underlay. This extra layer provides added protection against moisture infiltration.
-
Follow manufacturer guidelines:
- Always follow the manufacturer’s guidelines and recommendations for subfloor preparation. This ensures that your underlay and laminate flooring will perform optimally and adhere to warranty requirements.
Proper subfloor preparation is an essential step in ensuring the longevity and performance of your laminate flooring and underlay. By taking the time to assess and address subfloor issues, you’ll create a solid foundation for your flooring project and reduce the risk of future problems.
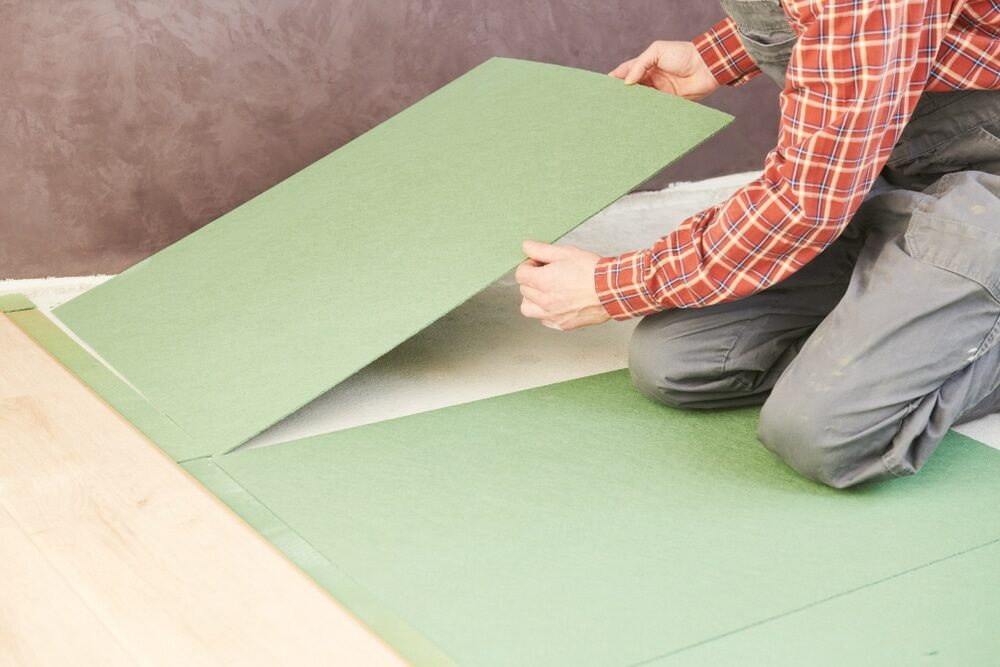
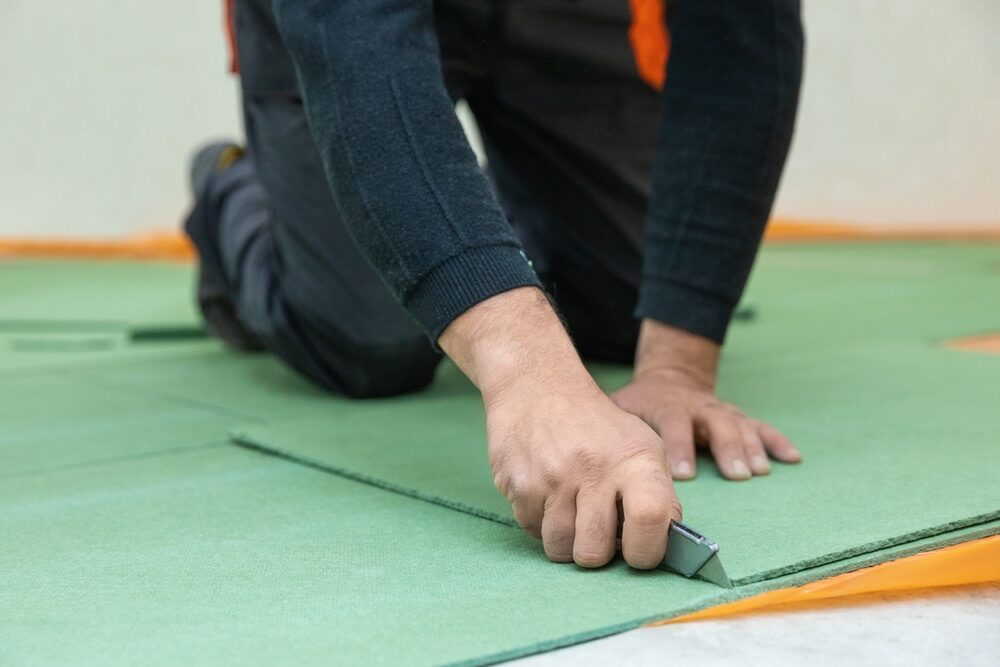
Underlay Installation Tips
Installing laminate flooring underlay correctly is essential for the longevity and performance of your flooring. Here are some key installation tips to ensure a successful underlay installation:
-
Gather your tools and materials:
- Before you begin, gather all the necessary tools and materials, including the underlay rolls or sheets, a utility knife, adhesive or tape (if required), measuring tape, and a straight edge.
-
Read the manufacturer’s instructions:
- Always refer to the manufacturer’s installation instructions and guidelines provided with the underlay. Each product may have specific requirements.
-
Prepare the subfloor:
- Ensure that the subfloor is clean, dry, level, and free from any debris or imperfections. Follow the subfloor preparation steps mentioned earlier.
-
Unroll and acclimate the underlay:
- Unroll the underlay in the room where you plan to install it and allow it to acclimate to the room’s temperature and humidity for the recommended period (usually 24-48 hours).
-
Start in one corner:
- Begin installation in one corner of the room, preferably the corner closest to the direction of your laminate flooring installation. Ensure that the underlay runs parallel to the direction of the laminate planks.
-
Seam Placement:
- If you’re using underlay rolls, position the seams to overlap slightly (usually 2-3 inches) and use adhesive or tape designed for underlay to secure the seams. Make sure they are smooth and tightly joined.
-
Cutting the underlay:
- Use a utility knife and a straight edge to trim excess underlay along the walls. Leave a small gap (about 1/8 inch) between the underlay and the wall to allow for expansion.
-
Adhesive or tape (if required):
- Some underlays may require adhesive or tape to secure them to the subfloor. Follow the manufacturer’s recommendations for adhesive or tape application.
-
Laying the laminate flooring:
- Once the underlay is in place, you can proceed with the installation of your laminate flooring according to the manufacturer’s instructions. The underlay provides the necessary cushioning and support for the laminate planks.
-
Inspect and Smooth:
- As you lay the laminate flooring over the underlay, periodically inspect for any wrinkles, bubbles, or imperfections in the underlay. Smooth out any issues before proceeding.
-
Trimming Around Obstacles:
- Use a utility knife to carefully cut the underlay around door frames, vents, or any other obstacles. Ensure a snug fit without overlapping or leaving gaps.
-
Finishing Touches:
- After your laminate flooring is fully installed, install baseboards or molding to cover the expansion gap and secure the edges of the underlay.
-
Dispose of Waste Properly:
- Dispose of any excess underlay, trimmings, and packaging materials in accordance with local regulations and recycling guidelines.
-
Clean Up:
- Finally, clean up the installation area, removing any debris or leftover materials, to leave your space looking tidy and ready for use.
By following these installation tips and paying close attention to the manufacturer’s instructions, you’ll ensure that your laminate flooring underlay is correctly installed, providing the support, cushioning, and protection your laminate flooring needs for optimal performance and longevity.

Budget Considerations
Choosing the right laminate flooring underlay involves finding a balance between quality and cost. Here are some budget considerations to help you make an informed decision:
- Understand Your Budget: Determine how much you’re willing to spend on underlay as part of your overall flooring project budget. Having a clear budget in mind will guide your choices.
- Consider Long-Term Savings: While it may be tempting to opt for the cheapest underlay available, remember that investing a bit more in a quality underlay can save you money in the long run. A durable underlay can extend the lifespan of your laminate flooring, reducing the need for replacements.
- Understand Material Costs: Different types of underlay materials come at various price points. Foam underlay is typically more affordable, while cork and rubber underlay tend to be pricier. Research the cost differences between materials to find the best fit for your budget.
- Thickness vs. Cost: Thicker underlay generally costs more than thinner options. Consider the thickness you need for your project while keeping your budget in mind. A moderately thick underlay can provide adequate support and comfort without breaking the bank.
- Evaluate Flooring Needs: Assess the specific needs of your laminate flooring project. For high-traffic areas or spaces where noise reduction is crucial, you may want to allocate a larger portion of your budget to underlay.
- Shop Around: Compare prices and offerings from different suppliers and retailers. Look for sales, promotions, and discounts that can help you save on underlay costs.
- Consider Package Deals: Some laminate flooring products come with an underlay included as part of a package deal. While this may increase the upfront cost, it could save you money compared to purchasing the underlay separately.
- Check for Rebates or Manufacturer Incentives: Some manufacturers offer rebates or incentives when you purchase a specific brand of underlay along with their laminate flooring. Look for these opportunities to maximize your budget.
- DIY vs. Professional Installation: Consider whether you’ll be installing the underlay yourself or hiring a professional. DIY installation can save on labor costs, but be sure you have the necessary skills and tools for the job.
- Warranty and Quality: Keep in mind that high-quality underlay often comes with longer warranties. While this may increase the initial cost, it can provide peace of mind and potential cost savings if issues arise.
- Eco-Friendly Options: If environmental sustainability is a priority, you may choose to allocate a portion of your budget for eco-friendly underlay materials. While these options can be slightly more expensive, they align with a commitment to sustainability.
- Plan for Extras: Factor in any additional expenses, such as adhesive or tape for securing seams, that may be required during the installation process.
- Consult a Professional: If you’re uncertain about your budget or need guidance on selecting the right underlay for your project, consider consulting with a flooring professional who can provide recommendations based on your specific needs and budget constraints.
Balancing your budget while ensuring the quality and performance of your laminate flooring underlay is crucial for a successful flooring project. By carefully considering these budget considerations, you can make an informed decision that meets your financial goals and flooring requirements.
Maintenance and care
To ensure the long-term durability and performance of your laminate flooring underlay, it’s important to take proper care of it. While underlay maintenance is relatively straightforward, following these maintenance and care guidelines will help you keep your underlay in excellent condition:
-
Regular Cleaning:
- Periodically clean the underlay with a vacuum cleaner or a soft-bristle broom to remove dust, dirt, and debris. Keeping it clean prevents particles from accumulating and potentially causing damage.
-
Spot Cleaning:
- If spills or stains occur, promptly clean them using a damp cloth or sponge. Avoid using excessive water, as prolonged exposure to moisture can damage certain underlay materials.
-
Moisture Prevention:
- Ensure that the underlay remains dry at all times. Be vigilant about preventing water or liquid spills from reaching the underlay, as moisture can lead to mold, mildew, or deterioration.
-
Use appropriate cleaners.
- If you need to use a cleaning solution, opt for a mild, pH-balanced cleaner specifically designed for use on underlay materials. Avoid harsh chemicals that can damage the underlay’s properties.
-
Inspect for damage:
- Regularly inspect the underlay for any signs of wear, tear, or damage. Look for tears, punctures, or areas where it has come loose from the subfloor. Address any issues promptly.
-
Re-sealing seams (if applicable):
- If your underlay has seams that are sealed with adhesive or tape, periodically check these seams for signs of deterioration. Re-seal as needed to maintain a proper moisture barrier.
-
Avoid heavy furniture pressure.
- Place furniture and heavy objects on top of your laminate flooring, not directly on the underlay. Excessive pressure or point loads can cause the underlay to compress and lose its effectiveness.
-
Maintain Proper Climate Control:
- Maintain consistent indoor humidity levels and temperatures to prevent moisture-related problems, such as mold or mildew growth. Proper climate control also helps prevent the underlay from expanding or contracting excessively.
-
Follow manufacturer recommendations:
- Always follow the manufacturer’s guidelines and recommendations for the care and maintenance of your specific underlay type. Different materials may have unique requirements.
-
Replace damaged sections:
- If a portion of the underlay becomes irreparably damaged, consider replacing that section rather than the entire underlay. This can be a cost-effective solution.
-
Schedule professional inspections:
- Periodically, consider scheduling a professional inspection of your laminate flooring and underlay to ensure everything is in good condition and to catch potential issues early.
-
Protect Against Sharp Objects:
- Take precautions to prevent sharp or pointed objects from piercing the underlay, as this can lead to damage that compromises its effectiveness.
By following these maintenance and care tips, you can prolong the life and performance of your laminate flooring underlay, ensuring it continues to provide the support, cushioning, and protection needed for your flooring. A well-maintained underlay contributes to the overall longevity and comfort of your laminate flooring.
Conclusion
In the world of laminate flooring, the importance of choosing the right underlay cannot be overstated. Your underlay is the unsung hero that provides essential support, comfort, and protection for your laminate flooring. Throughout this comprehensive guide, we’ve explored the key factors to consider when selecting the best laminate flooring underlay for your needs.
Armed with the knowledge and insights from this guide, you’re well-prepared to make an informed decision when it comes to choosing the best laminate flooring underlay for your specific project. Whether you prioritize comfort, sound reduction, or sustainability, the right underlay will enhance your laminate flooring experience and help create a comfortable and long-lasting space in your home. So, go ahead and embark on your flooring journey with confidence, knowing that your underlay choice is the foundation of your flooring success.

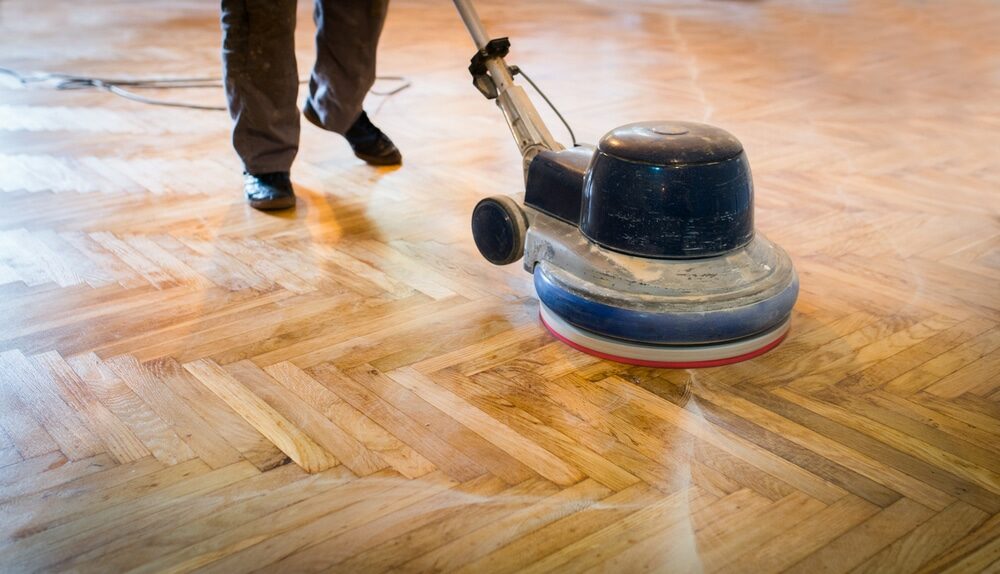

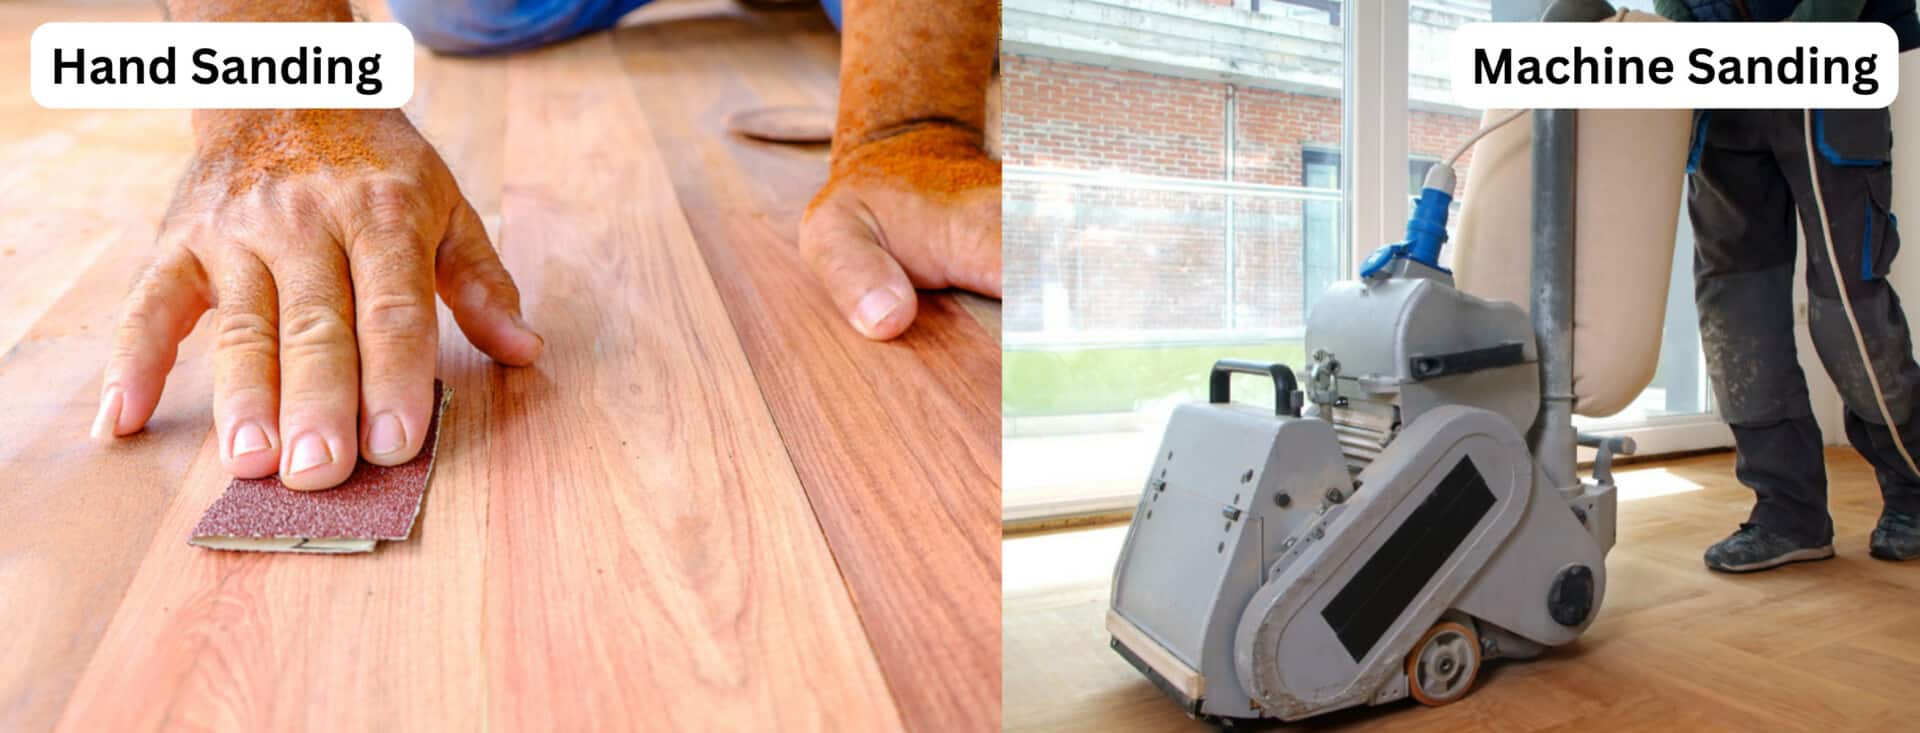
Sanding
We provide virtually dust-free sanding with our continuous belt machinery with mobile extraction units, giving you a safer environment for your family.
Oiling
This organic finish not only adds beauty to your home but also has exceptional water-repellent characteristics, making it easier to clean and maintain.
Waxing
This natural floor finish offers the softest and most mellow appearance – and leaves your floor able to breath.
Buffing
Using soft buffing machines (and hand-polishing where required) will bring a wonderful sheen to your newly-finished floor.
Repairs
We offer a full assessment of your wooden floors to determine what repairs are needed to provide the perfect working surface for the later stages of sanding, staining and sealing.
Restoration
We offer a comprehensive restoration process designed to address floors that are improperly fitted or damaged over time through wear and tear.
Request a fixed price quote for your wood floor restoration now
Simply enter your postcode below to get started.
Services
Wood Floor Sanding Wood Floor Restoration Wood Floor Scratch Repair Squeaky Wood Floor Repair Parquet Floor Sanding Parquet Floor Restoration Commercial Floor Sanding Church Floor Sanding Community Centre Floor Sanding School Floor Sanding Gap Filling Gap Filling with ResinCopyright © Mr Sander®
Privacy & Cookies Terms & Conditions Complaints Procedure Cancellation Rights Sitemap

Get An Instant Price Estimate Before You Go…
Simply enter the rooms you need sanded and we’ll provide you with a price estimate instantly! Try our price calculator now.
Get a Price Estimate NowLocal Floor Sanding Experts
Over 500 5-Star Reviews
Safe, Dust Free Sanding
Operating Since 1994