London:
Nationwide:
25,000+
Floors Restored
27 Years Experience
Wood Flooring Association Certified
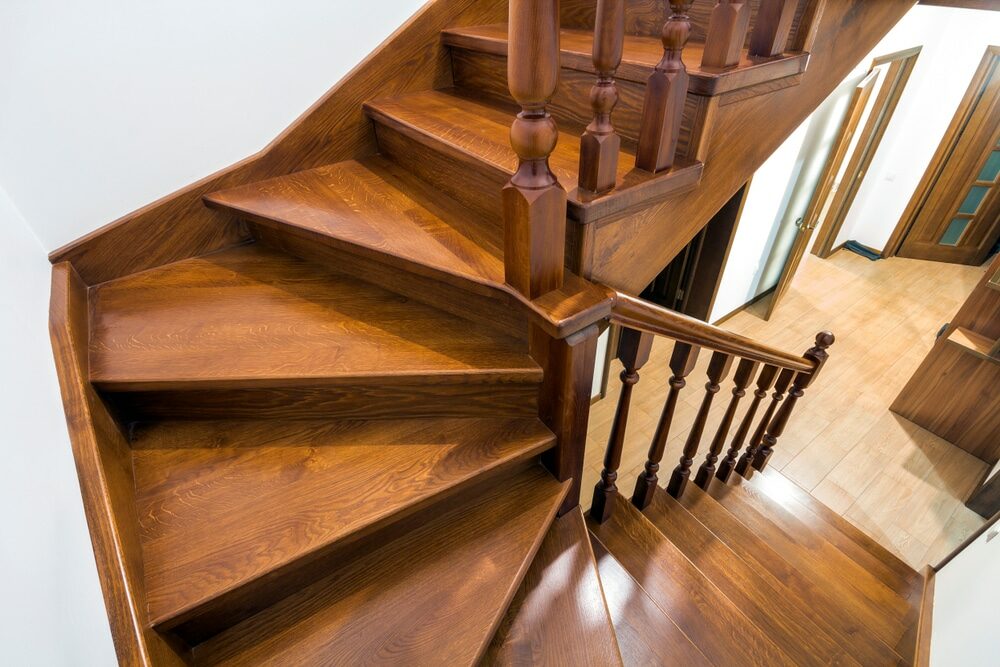
How to Renovate a Wooden Staircase: Cost-Effective Tips and Ideas
Posted on December 6, 2023
Wooden Staircase
Revamp Your Wooden Staircase: Pro Tips for a Cost-Effective Transformation
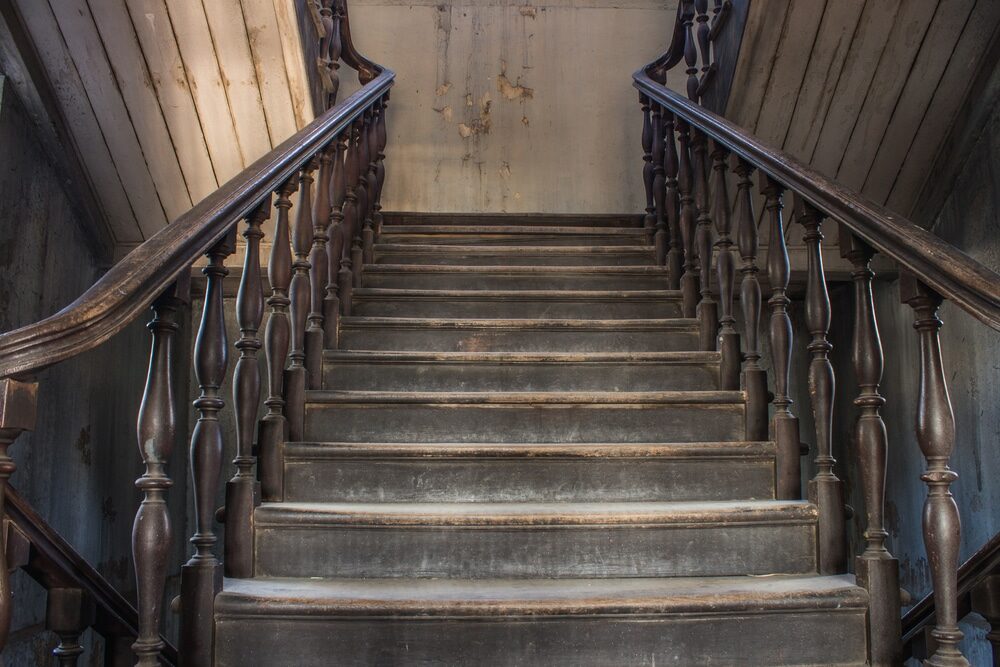
A well-maintained and aesthetically pleasing wooden staircase can elevate the overall look and feel of your home. Whether it’s the focal point of your entryway or a connecting element between different levels of your house, a wooden staircase holds immense potential to enhance the ambiance of your living space. However, over time, even the most beautiful wooden staircases can start showing signs of wear and tear.
The good news is that you don’t need to break the bank to breathe new life into your staircase. Renovating a wooden staircase can be a cost-effective project if you approach it with the right knowledge and a bit of creativity. In this comprehensive guide, we will walk you through the process of revitalizing your wooden staircase while keeping your budget in check.
From assessing the condition of your staircase to selecting the best materials, from step-by-step renovation techniques to budget-friendly design ideas, we’ve got you covered. Whether you’re a seasoned DIY enthusiast or considering professional help, this guide will provide you with valuable insights and tips to transform your wooden staircase into a stunning focal point of your home.
So, if you’re ready to embark on a journey of staircase renovation that won’t break the bank, let’s get started with our cost-effective tips and creative ideas to revamp your wooden staircase. Your home’s makeover is just a few steps away!
Assessment and planning
Before you start swinging hammers and wielding paintbrushes, it’s essential to begin your wooden staircase renovation project with a solid plan. Proper assessment and planning will not only save you time and money but also ensure the success of your endeavor.
1. Evaluate the current condition:
- Begin by inspecting your existing wooden staircase thoroughly. Look for signs of damage, wear, or structural issues. Common problems include loose or squeaky steps, cracked or splintered wood, and areas with water damage.
- Take note of any safety concerns, such as loose handrails or balusters, which should be addressed during the renovation.
- Determine the type of wood used in your staircase, as this will influence your renovation choices. Different woods may require different treatments.
2. Set renovation goals:
- Clearly define your renovation objectives. Are you aiming for a complete overhaul, or do you want to refresh the existing look with minimal changes?
- Consider the style you want to achieve. Are you going for a modern, rustic, or traditional look? Your staircase’s design should harmonize with the overall decor of your home.
3. Create a budget.
- Establish a realistic budget for your staircase renovation. Take into account the cost of materials, tools, and any professional services you might need.
- Don’t forget to include a contingency fund for unexpected expenses that may arise during the project.
4. Timeframe:
- Determine a timeline for your renovation. Assess how long each phase of the project will take, and plan accordingly.
- Keep in mind that certain steps, such as drying times for finishes, may require waiting periods.
5. DIY or professional help:
- Decide whether you’ll tackle the renovation as a DIY project or hire professionals. Your choice may depend on your skills, available time, and the complexity of the renovation.
- If you opt for professional help, start researching and contacting contractors or carpenters early in the planning process.
Materials and tools
To successfully renovate your wooden staircase, you’ll need the right materials and tools at your disposal. Having the proper equipment and supplies is essential for a smooth and efficient renovation process. Below, we’ve compiled a list of the materials and tools you’ll likely need:
Materials:
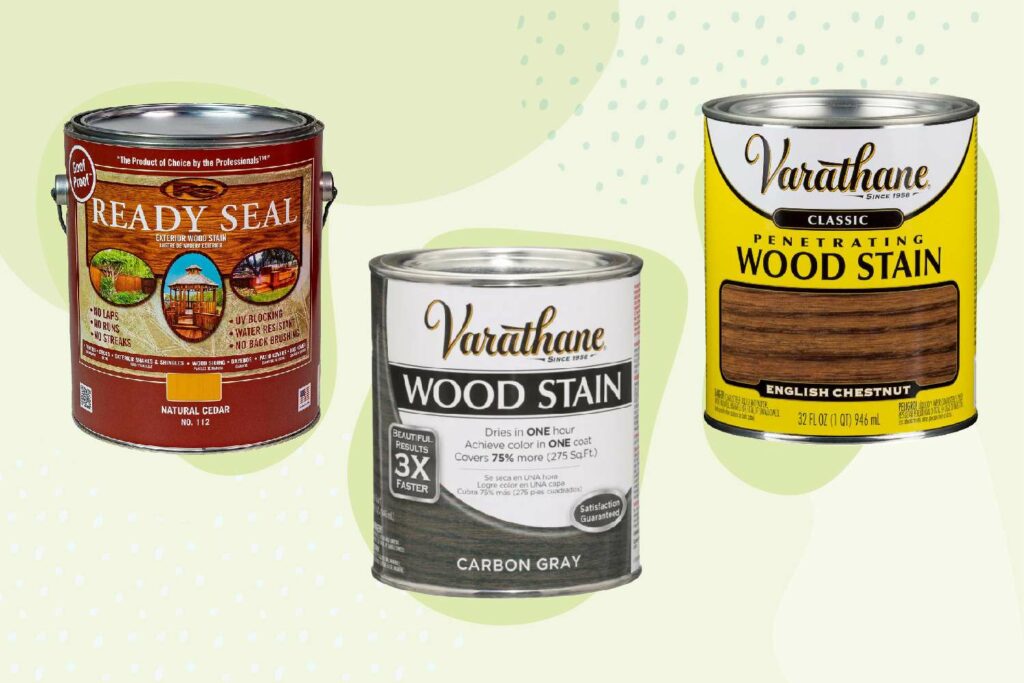
1. Wood stain or paint:
- Choose a high-quality wood stain or paint in the color or finish that matches your desired staircase look. Water-based options are eco-friendly and easy to clean up.
2. Sealer or varnish:
- A clear sealer or varnish will protect the wood and enhance its durability. Select one that suits the type of wood you’re working with.
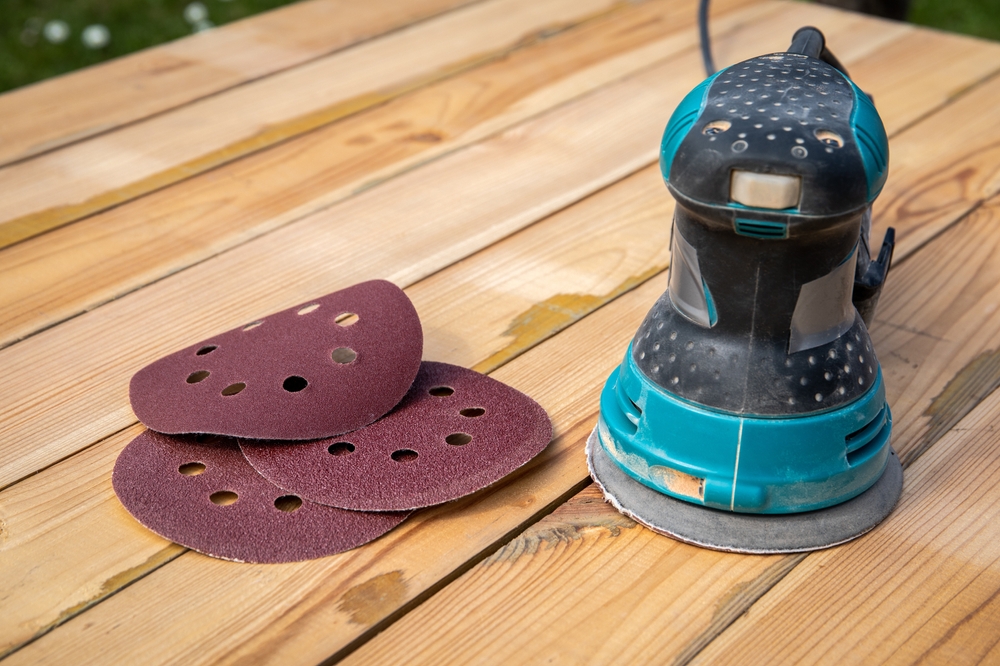
3. Sanding Supplies:
- Sandpaper in various grits (coarse to fine) is used to smooth the wood surface.
- Sanding blocks or orbital sanders for more extensive sanding tasks
4. Wood Filler:
- wood filler or putty for repairing cracks, holes, or gaps in the wood.
5. Primer:
- If you’re painting your staircase, a quality primer will help the paint adhere better to the wood.
6. Safety Equipment:
- dust masks, safety goggles, and ear protection for personal safety during sanding and painting.
- Drop cloths or plastic sheeting to protect the surrounding area from dust and paint splatters.
7. Cleaning Supplies:
- Tack cloths or damp rags to wipe down surfaces between sanding and painting.
- Use mild detergent or wood cleaner for thorough cleaning before starting the project.
8. Staircase Components:
- replacement balusters, handrails, or newel posts if your renovation includes updating these elements.
Tools:
1. Screwdrivers and Screwdriver Set:
- to tighten loose screws on handrails and balusters.
2. Saw:
- A saw is suitable for cutting wood in case you need to trim or replace parts of the staircase.
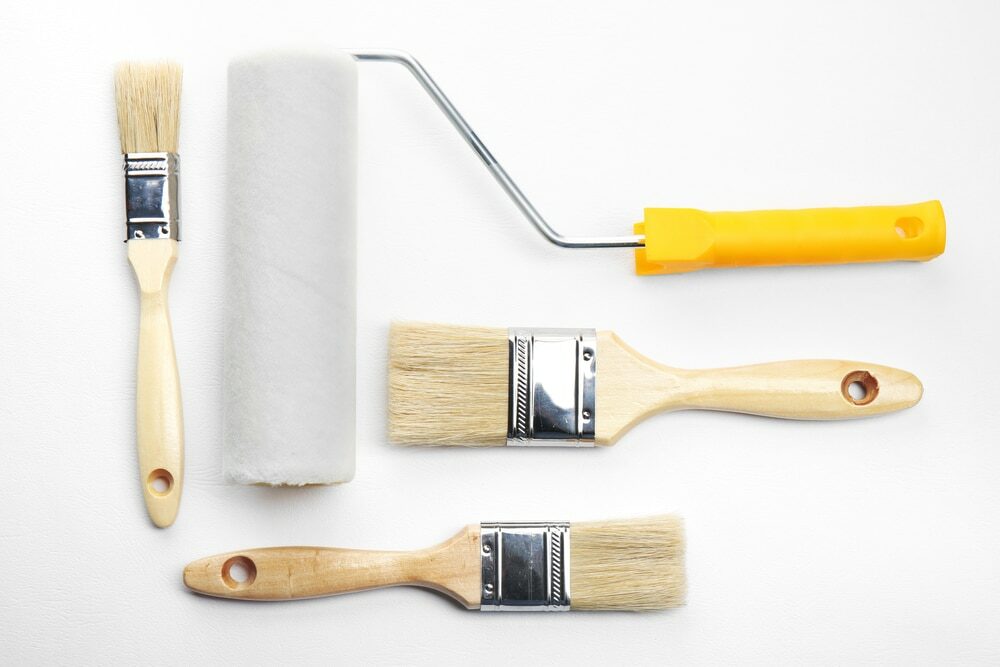
3. Paintbrushes and rollers:
- high-quality paintbrushes and rollers for applying stain, paint, or sealer evenly.
4. Putty Knife or Spatula:
- for applying wood filler and smoothing it over imperfections.
5. Clamps:
- Clamps can be helpful for securing parts during repairs or ensuring a tight bond when gluing.
6. Level and Measuring Tools:
- level to ensure your staircase components are straight and level.
- measuring tape, a square, and a pencil for accurate measurements and marking.
7. Safety Sawhorses:
- to provide a stable platform for working on staircase components.
8. Power Sander:
- An electric or cordless power sander can significantly speed up the sanding process.
Having the right materials and tools on hand will make your wooden staircase renovation project more manageable and efficient. It’s essential to invest in quality materials to achieve a durable and visually appealing result. Additionally, always follow safety precautions when using tools and working with wood products.
Safety Precautions
Renovating a wooden staircase can be a rewarding project, but it also comes with potential hazards and safety concerns. To ensure your well-being and the success of your renovation, it’s essential to prioritize safety throughout the entire process. Here are some critical safety precautions to keep in mind:
1. Personal Protective Equipment (PPE):
- Eye Protection: Wear safety goggles or glasses to shield your eyes from dust, debris, and flying particles generated during sanding and cutting.
- Respiratory Protection: Use a dust mask or respirator to avoid inhaling harmful dust and fumes, especially when sanding or working with finishes.
- Hearing Protection: Employ earplugs or earmuffs to protect your hearing, as power tools and sanders can be loud.
- Gloves: Wear appropriate gloves to protect your hands when handling materials and tools.
2. Ventilation:
- Work in a well-ventilated area, preferably outdoors or with windows and doors open. Proper ventilation helps dissipate dust and fumes.
3. Dust Control:
- Minimize dust by using dust collection systems or vacuum attachments with power tools when sanding or cutting.
- Periodically clean up dust and debris to maintain a safe working environment.
4. Electrical Safety:
- Ensure that all electrical tools and cords are in good condition without exposed wires or damage.
- Use ground-fault circuit interrupters (GFCIs) when working in areas with moisture or water to prevent electrical shocks.
5. Ladder Safety:
- When working on elevated areas of the staircase, such as handrails or balusters, use a sturdy and properly positioned ladder.
- Ensure the ladder is on a stable surface, and follow proper ladder safety practices.
6. Tool Safety:
- Familiarize yourself with the proper use and safety features of all tools and equipment before starting work.
- Keep sharp tools and cutting edges away from your body and hands.
7. Chemical Safety:
- When working with paints, stains, sealers, or other chemicals, follow manufacturer instructions for safe use, storage, and disposal.
- Use these substances in well-ventilated areas and wear appropriate protective gear.
8. Fire Safety:
- Be cautious when using heat sources like heat guns or torches, as they can pose fire hazards. Keep fire extinguishers nearby.
9. First Aid Kit:
- Have a well-stocked first-aid kit readily available in case of minor injuries or accidents.
10. Work Methodically:
- Take your time and work methodically, especially when using power tools. Rushing can lead to accidents.
11. Emergency Planning:
- Familiarize yourself with the location of emergency exits and how to shut off utilities (gas, electricity, and water) in case of emergencies.
12. Seek professional help when necessary.
- If you encounter structural issues or are unsure about certain aspects of the renovation, consider consulting or hiring a professional carpenter or contractor.
Remember, safety should always be your top priority when renovating a wooden staircase.

Step-by-step renovation process
Now that you’ve assessed your staircase, gathered the necessary materials and tools, and taken safety precautions, it’s time to dive into the renovation process. Follow these steps for a successful wooden staircase makeover:
Step 1: Remove the old finish or carpet.
- If your staircase has a previous finish or carpet, start by removing it. Use a utility knife to cut and peel away the carpet and pry up any tack strips or staples.
- For an existing finish, you can strip it using paint or a finish remover. Follow the manufacturer’s instructions, wear protective gloves, and work in a well-ventilated area.
Step 2: Repair damaged wood
- Inspect the staircase for any damaged or rotting wood. Replace or repair any steps, balusters, or handrails that are in poor condition.
- Fill in cracks, holes, or gaps with wood filler. Allow it to dry, then sand the repaired areas until they are smooth and level.
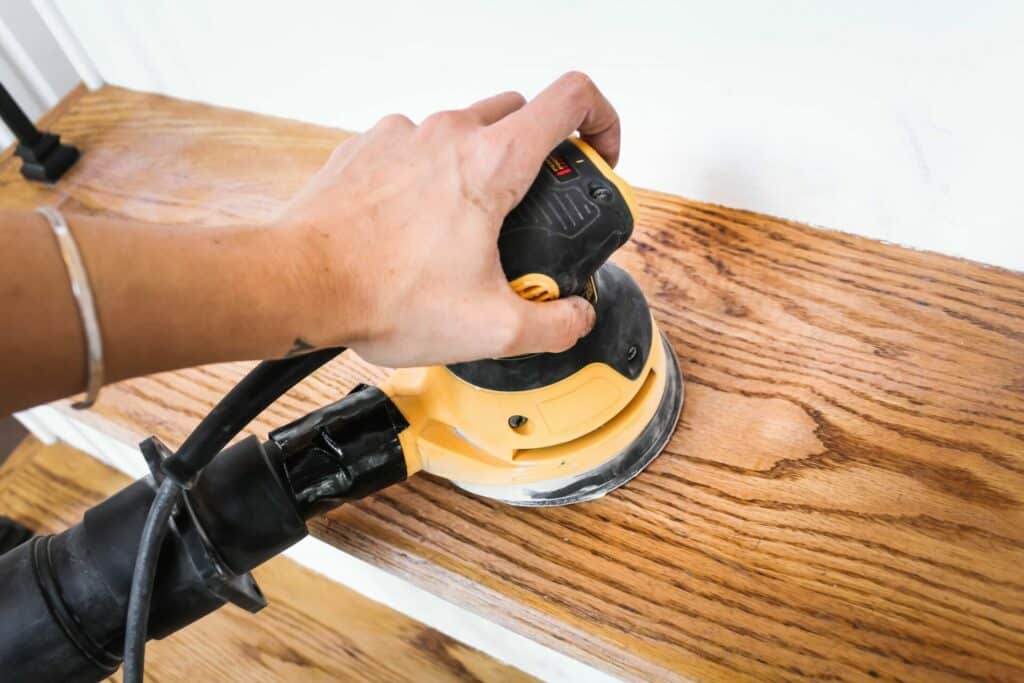
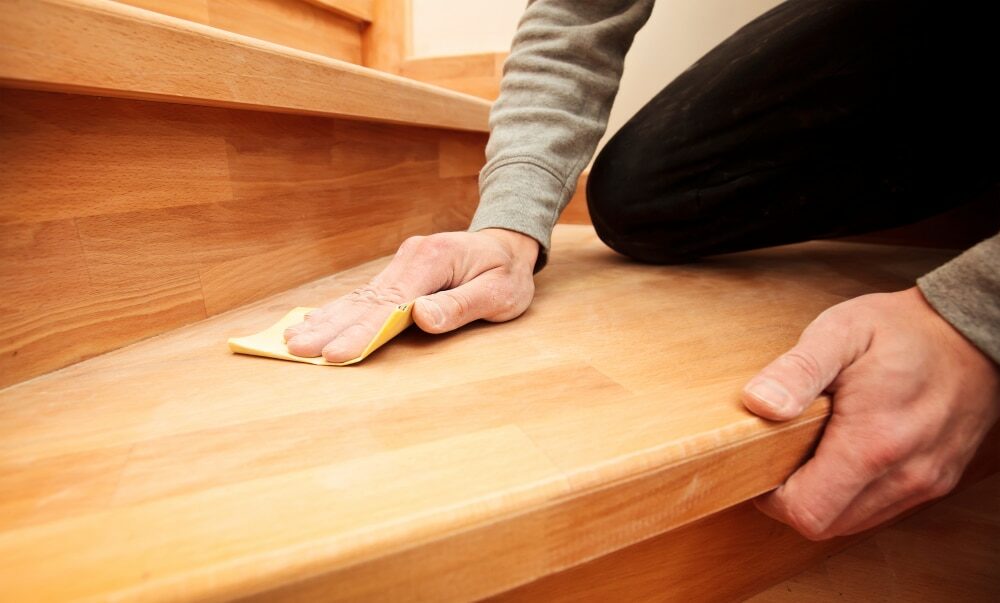
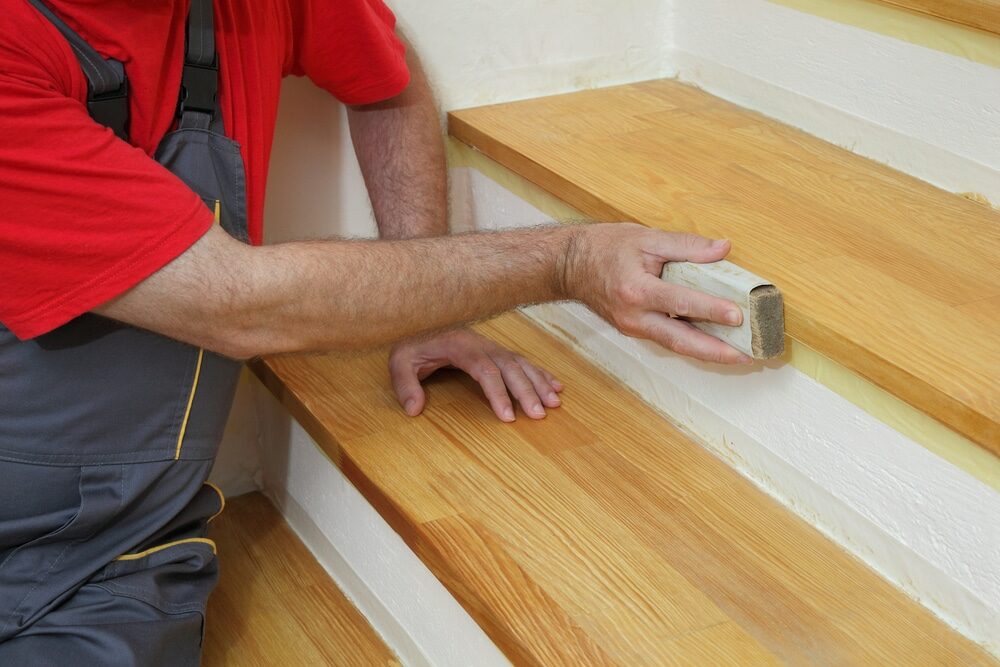
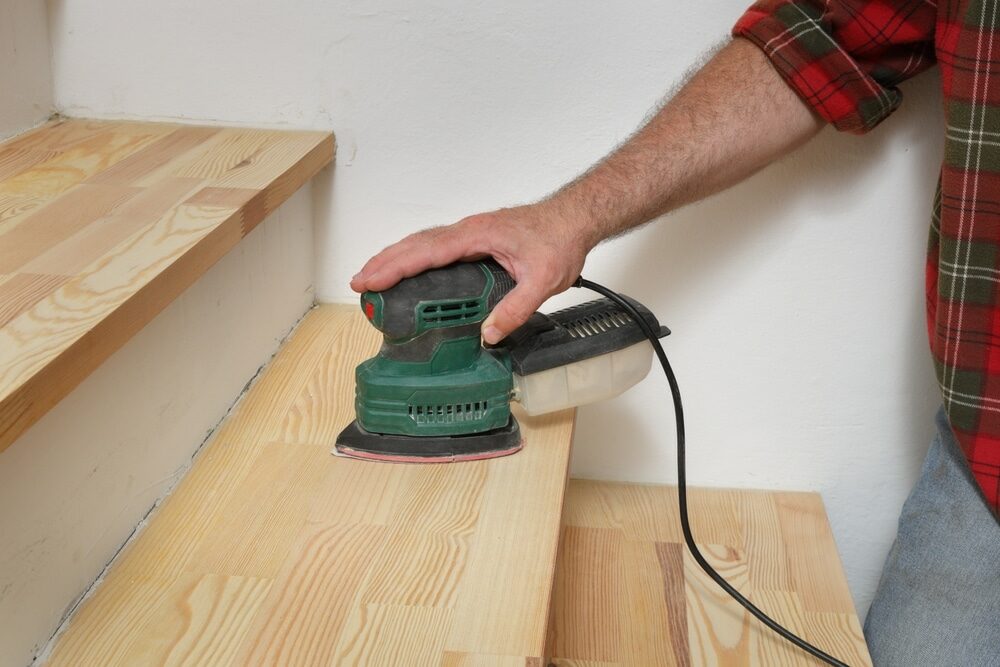
Step 3: Sand and Smooth Surfaces
- Sand all wooden surfaces with progressively finer-grit sandpaper to remove imperfections and old finishes and to create a smooth surface. Start with a coarse grit (around 60–80) and work your way up to a finer grit (180–220).
- Pay special attention to edges, corners, and intricate details on balusters or newel posts.
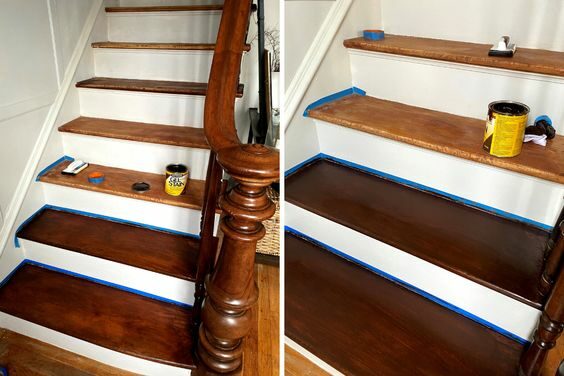
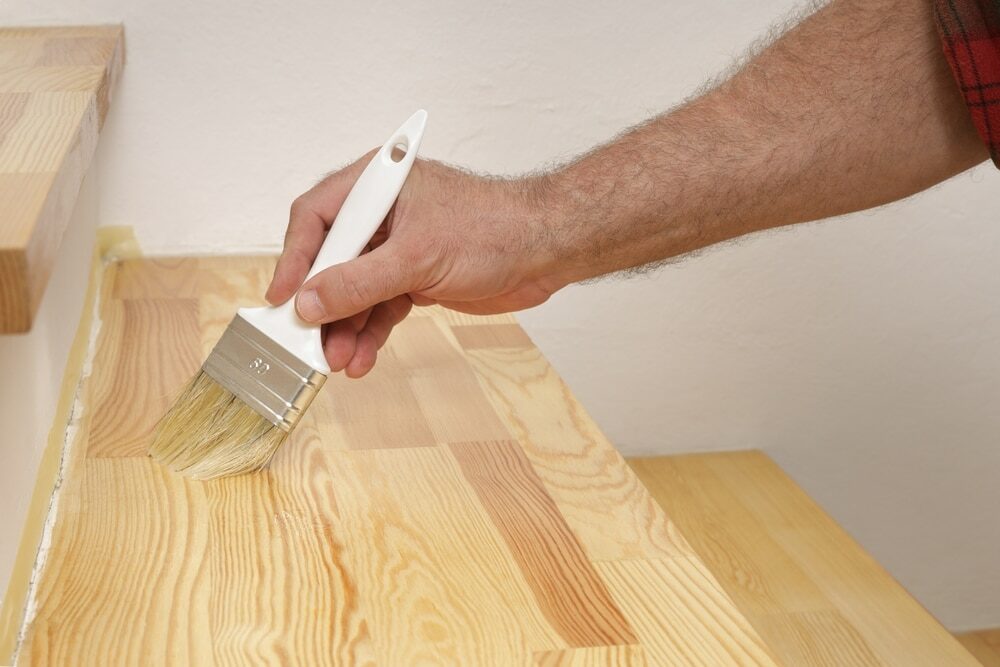
Step 4: Staining or Painting Options
- Decide whether you want to stain or paint your wooden staircase. Staining enhances the natural beauty of the wood, while painting provides a more customized look.
- Apply the wood stain evenly with a brush or cloth, following the wood grain. Allow it to penetrate for the recommended time, and then wipe away any excess stain with a clean cloth.
- If you choose to paint, use a primer first and then apply paint in thin, even coats. Sand lightly between coats for a smooth finish.
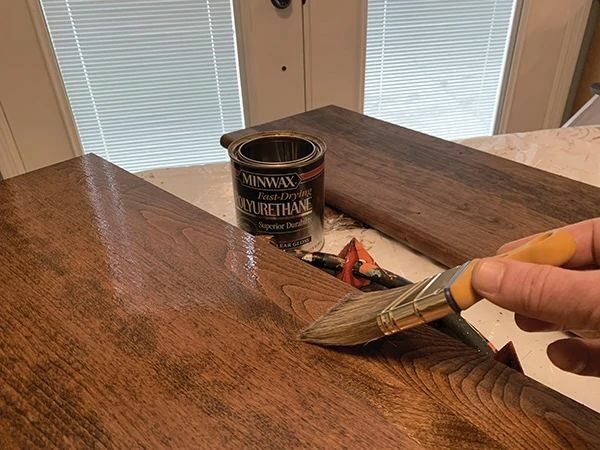
Step 5: Applying a Protective Finish
- Once your stain or paint has dried completely, apply a clear protective finish, such as polyurethane, varnish, or a sealer. This step adds durability and protection to your staircase.
- Follow the manufacturer’s instructions for application and drying times, and be sure to ventilate the area properly.
Step 6: Reassemble and reinstall
- Reassemble the staircase components, including handrails, balusters, and newel posts, following the manufacturer’s guidelines and ensuring everything is secure.
- If you’ve replaced any components, make sure they align correctly with the existing structure.
Step 7: Final Touches
- Inspect the entire staircase for any touch-ups or areas that may need additional attention.
- Clean the staircase thoroughly to remove any dust or debris from the renovation process.
Congratulations! You’ve successfully renovated your wooden staircase, and it’s now ready to be showcased as a beautiful focal point in your home. Regular maintenance and care will help preserve the renewed appearance of your staircase for years to come.
Cost-effective design ideas
Renovating a wooden staircase doesn’t have to be expensive to yield stunning results. With a bit of creativity and some smart design choices, you can transform your staircase on a budget. Here are some cost-effective design ideas to consider:
1. Refinish and highlight the natural beauty:
- One of the most budget-friendly options is to refinish your wooden staircase to highlight its natural beauty. Sand down the wood to remove old finishes and stains, then apply a clear sealer or varnish. This approach brings out the wood’s grain and texture while protecting it for years to come.
2. Paint for a Fresh Look:
- Painting your staircase can completely change its appearance without breaking the bank. Choose a paint color that complements your home’s interior and style. Consider a classic white or a bold, contrasting color for a dramatic effect.
3. Add a runner or stair treads:
- Instead of completely covering your staircase with carpet, opt for a stair runner or stair treads. These can add a touch of style and comfort while still showcasing the wooden steps beneath.
4. Decorative Stencils or Stickers:
- For a unique and cost-effective design, consider using decorative stencils or stickers on your staircase risers. This adds a personalized touch and can be easily changed or updated as your style evolves.
5. Replace balusters and newel posts:
- If your budget allows, consider updating only the balusters and newel posts. Choose affordable yet stylish options to give your staircase a fresh look without the need for a complete overhaul.
6. Embrace the Shabby Chic Look:
- If you’re a fan of the shabby chic style, consider a distressed finish for your staircase. Sand the wood lightly, add some paint, and then distress it with sandpaper or other tools to create a rustic and charming appearance.
7. Utilize Decorative Molding:
- Add decorative molding or trim to your staircase for an elegant and budget-friendly touch. This can be applied to the risers, stringers, or even the handrails to give your staircase a custom look.
8. Creative Handrail Options:
- Explore creative handrail options, such as using painted pipes, ropes, or reclaimed wood, for a unique and budget-friendly railing system.
9. Wall Art and Gallery:
- Make use of the space around your staircase by creating a gallery wall with family photos, artwork, or decorative mirrors. This can enhance the overall look of your staircase area.
10. DIY Artwork or Murals:
- If you have artistic talents, consider painting a mural or artwork directly onto your staircase wall or risers. This can be a cost-effective way to add a personal and artistic touch.
DIY vs. hiring professionals
When it comes to renovating a wooden staircase, one of the crucial decisions you’ll need to make is whether to take on the project yourself (DIY) or hire professionals. Both options have their advantages and drawbacks, and your choice will depend on various factors.
DIY (Do-It-Yourself):
Pros:
- Cost Savings: DIY projects can be more budget-friendly since you won’t be paying for labor costs.
- Personal Satisfaction: Completing a renovation on your own can be immensely satisfying and provide a sense of accomplishment.
- Creative Control: You have full control over the design, materials, and timeline of the project.
- Flexibility: You can work on your schedule and take breaks as needed.
Cons:
- Skill and Experience: Renovating a staircase may require advanced carpentry and woodworking skills. Inexperienced DIYers might encounter challenges or make mistakes.
- Time-consuming: DIY projects often take longer to complete, especially if you’re learning as you go.
- Risk of Errors: Mistakes can be costly and affect the structural integrity or aesthetic appeal of your staircase.
- Safety Concerns: DIY projects can pose safety risks if proper precautions and equipment are not used.
Hiring Professionals:
Pros:
- Expertise: Professionals have the knowledge, experience, and skills to ensure a high-quality renovation.
- Time Efficiency: Hiring experts can expedite the project, minimizing disruptions to your daily life.
- Quality Assurance: Professionals are more likely to deliver a finished product that meets or exceeds your expectations.
- Safety: Trained professionals are well-versed in safety protocols, reducing the risk of accidents.
Cons:
- Cost: Hiring professionals typically involves labor costs, which can make the project more expensive.
- Limited Creative Control: You may have less control over the project’s design and timeline when working with professionals.
- Scheduling: You’ll need to coordinate with the professionals’ availability, which might not align with your timeline.
Maintenance and longevity
Your beautifully renovated wooden staircase is now a focal point of your home, and you want it to stay that way for years to come. To ensure its longevity and preserve its appearance, it’s essential to follow a maintenance routine. Here are some tips to help you maintain your staircase:
1. Regular Cleaning:
- Dust and vacuum your staircase regularly to prevent dirt and debris from accumulating on the surfaces.
- Use a soft, dry cloth or a slightly damp cloth for gentle cleaning. Avoid harsh chemicals or abrasive cleaners that could damage the finish.
2. Protective Measures:
- Place doormats at the entrances to your home to minimize the amount of dirt and grit brought in from outside.
- Consider installing stair runners or stair treads to protect high-traffic areas and reduce wear on the wood.
3. Preventative Maintenance:
- Routinely inspect your staircase for any signs of wear, loose components, or damage. Address issues promptly to prevent further deterioration.
- Tighten loose handrails, balusters, and newel posts as needed.
4. Seasonal Humidity Control:
- Wood can expand and contract with changes in humidity. To minimize this, maintain a consistent indoor humidity level, especially during extreme seasons.
- Consider using a humidifier or dehumidifier to regulate indoor moisture levels.
5. Protective Coatings:
- Periodically inspect the protective finish (sealer or varnish) on your staircase. If it starts to show signs of wear, consider reapplying a fresh coat to maintain its protection.
6. Avoiding Water Damage:
- Keep your staircase dry and free from water spills. Wipe up any spills promptly to prevent water damage to the wood.
- Ensure that your staircase is adequately sealed or varnished to repel moisture.
7. Minimize direct sunlight.
- Prolonged exposure to direct sunlight can cause wood to fade or discolor. Consider using curtains or blinds to shield your staircase from harsh sunlight.
8. Gentle Use:
- Encourage family members and guests to use the staircase gently. Avoid dragging heavy items or wearing shoes with abrasive soles.
9. Periodic Inspection:
- Every few years, conduct a thorough inspection of your staircase to assess its condition. Look for signs of wear, damage, or areas that may need refinishing.
10. Professional Maintenance:
- Consider hiring professionals for periodic maintenance and refinishing. They can assess the staircase’s condition and apply fresh finishes as needed.
Budgeting and cost-saving tips
Renovating a wooden staircase can be a rewarding project, but it’s essential to manage your budget wisely to ensure a cost-effective outcome. Here are some budgeting and cost-saving tips to help you get the most value out of your renovation:
1. Set a realistic budget.
- Begin by establishing a clear and realistic budget for your staircase renovation. Consider all expenses, including materials, tools, labor (if hiring professionals), and contingencies for unexpected costs.
2. DIY Where Possible:
- Save on labor costs by taking on DIY tasks that match your skill level. Sanding, painting, or staining can often be done by homeowners with some basic tools and guidance.
3. Shop Smart for Materials:
- Look for discounts, sales, and promotions at home improvement stores or online retailers. Buying materials in bulk or during sales events can significantly reduce costs.
- Consider using reclaimed or salvaged wood for certain components of your staircase, such as balusters or handrails, to save money while adding character.
4. Use existing structures:
- Whenever possible, refurbish and reuse existing staircase components like handrails, newel posts, or balusters. Refinishing them can give your staircase a fresh look without the expense of replacement.
5. Plan Efficiently:
- Plan your renovation project carefully to minimize waste. Accurate measurements and calculations can help you order the right amount of materials without excess.
6. Compare professional quotes:
- If you decide to hire professionals for specific tasks, obtain multiple quotes and compare them. This ensures you get a fair price and quality service.
7. Tackle small repairs promptly.
- Address minor repairs as soon as they arise. Neglecting them can lead to more extensive and costly issues down the road.
8. Opt for cost-effective finishes:
- Select cost-effective finishes like water-based stains or paints, which are often more affordable than high-end options while still providing a great finish.
9. Borrow or Rent Tools:
- Borrow or rent specialized tools you don’t already own. This can save you from buying expensive equipment that you may only use for this project.
10. Prioritize essential repairs:
- Focus your budget on essential repairs and improvements that enhance safety and functionality. Cosmetic enhancements can be added later, when your budget allows.
11. Do thorough research.
- Invest time in researching materials and techniques. Understanding your options can help you make informed decisions that align with your budget.
12. Consider a phased renovation:
- If your budget is limited, consider renovating your staircase in phases. Start with essential repairs and updates, and tackle decorative or non-essential elements later.
13. DIY Finishing Touches:
- Add personal touches and decorative elements yourself, such as painting or staining. DIY projects like these can save money and add character to your staircase.

Conclusion
Renovating a wooden staircase may seem like a daunting task, but armed with the right knowledge, tools, and a well-thought-out plan, it can be a highly rewarding and budget-friendly project. Your staircase, once a functional element of your home, now stands as a stunning testament to your creativity and craftsmanship.
Throughout this guide, we’ve explored the step-by-step renovation process, safety precautions, materials, and tools, along with design ideas and budget-saving tips to help you achieve the staircase of your dreams. Whether you’re a seasoned DIY enthusiast or choose to enlist the help of professionals, the key to success lies in thorough planning and careful execution.
Remember that a renovated wooden staircase not only enhances the aesthetic appeal of your home but also adds value and character. It becomes a focal point, drawing admiration from guests and providing a sense of pride for homeowners. As you ascend and descend your newly transformed staircase each day, you’ll be reminded of the dedication and effort you put into creating a space that reflects your personal style.
So, embrace the journey of staircase renovation, whether you opt for a classic, modern, or unique design. Let your creativity flow, and don’t be afraid to infuse your personality into every step. With proper maintenance and care, your wooden staircase will continue to shine for years to come, serving as a symbol of your home’s beauty and elegance.
Thank you for joining us on this renovation adventure. We hope this guide has provided you with the knowledge and inspiration you need to embark on your staircase renovation project with confidence and enthusiasm. Here’s to the beauty and charm of your newly transformed wooden staircase!

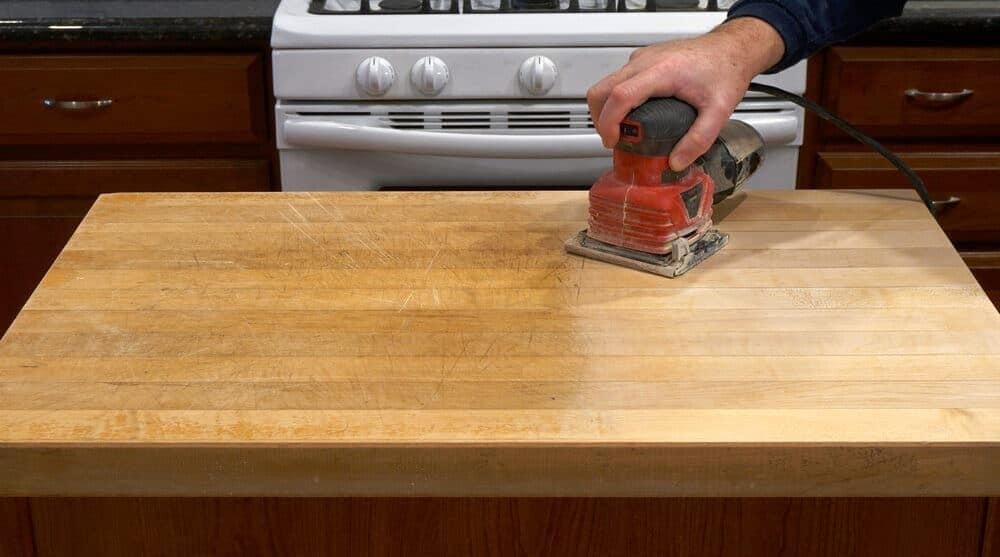
Sanding
We provide virtually dust-free sanding with our continuous belt machinery with mobile extraction units, giving you a safer environment for your family.
Oiling
This organic finish not only adds beauty to your home but also has exceptional water-repellent characteristics, making it easier to clean and maintain.
Waxing
This natural floor finish offers the softest and most mellow appearance – and leaves your floor able to breath.
Buffing
Using soft buffing machines (and hand-polishing where required) will bring a wonderful sheen to your newly-finished floor.
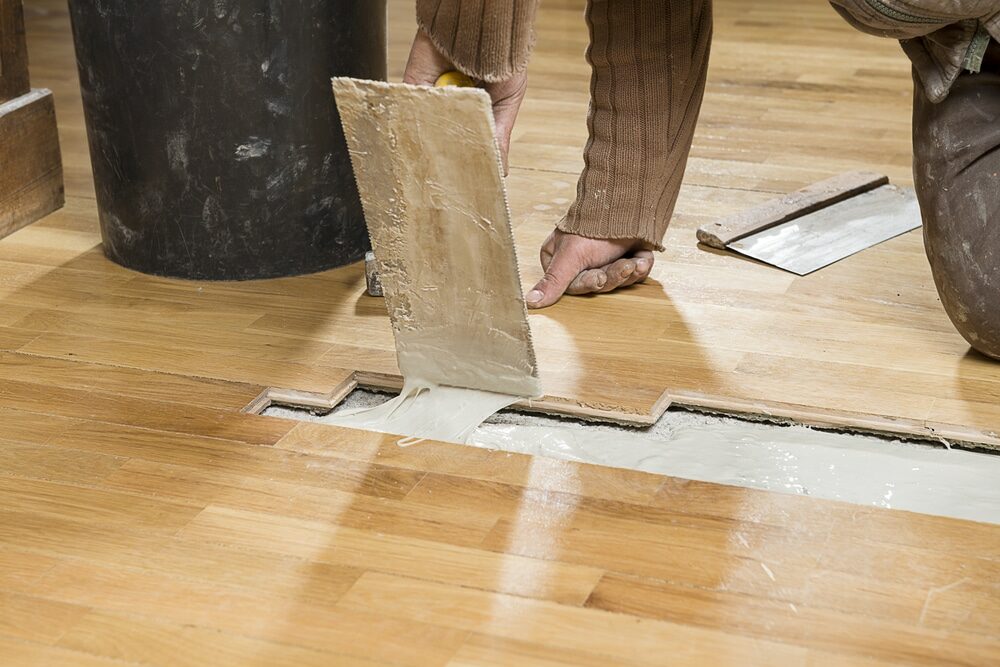
Repairs
We offer a full assessment of your wooden floors to determine what repairs are needed to provide the perfect working surface for the later stages of sanding, staining and sealing.
Restoration
We offer a comprehensive restoration process designed to address floors that are improperly fitted or damaged over time through wear and tear.
Request a fixed price quote for your wood floor restoration now
Simply enter your postcode below to get started.
Services
Wood Floor Sanding Wood Floor Restoration Wood Floor Scratch Repair Squeaky Wood Floor Repair Parquet Floor Sanding Parquet Floor Restoration Commercial Floor Sanding Church Floor Sanding Community Centre Floor Sanding School Floor Sanding Gap Filling Gap Filling with ResinCopyright © Mr Sander®
Privacy & Cookies Terms & Conditions Complaints Procedure Cancellation Rights Sitemap

Get An Instant Price Estimate Before You Go…
Simply enter the rooms you need sanded and we’ll provide you with a price estimate instantly! Try our price calculator now.
Get a Price Estimate NowLocal Floor Sanding Experts
Over 500 5-Star Reviews
Safe, Dust Free Sanding
Operating Since 1994